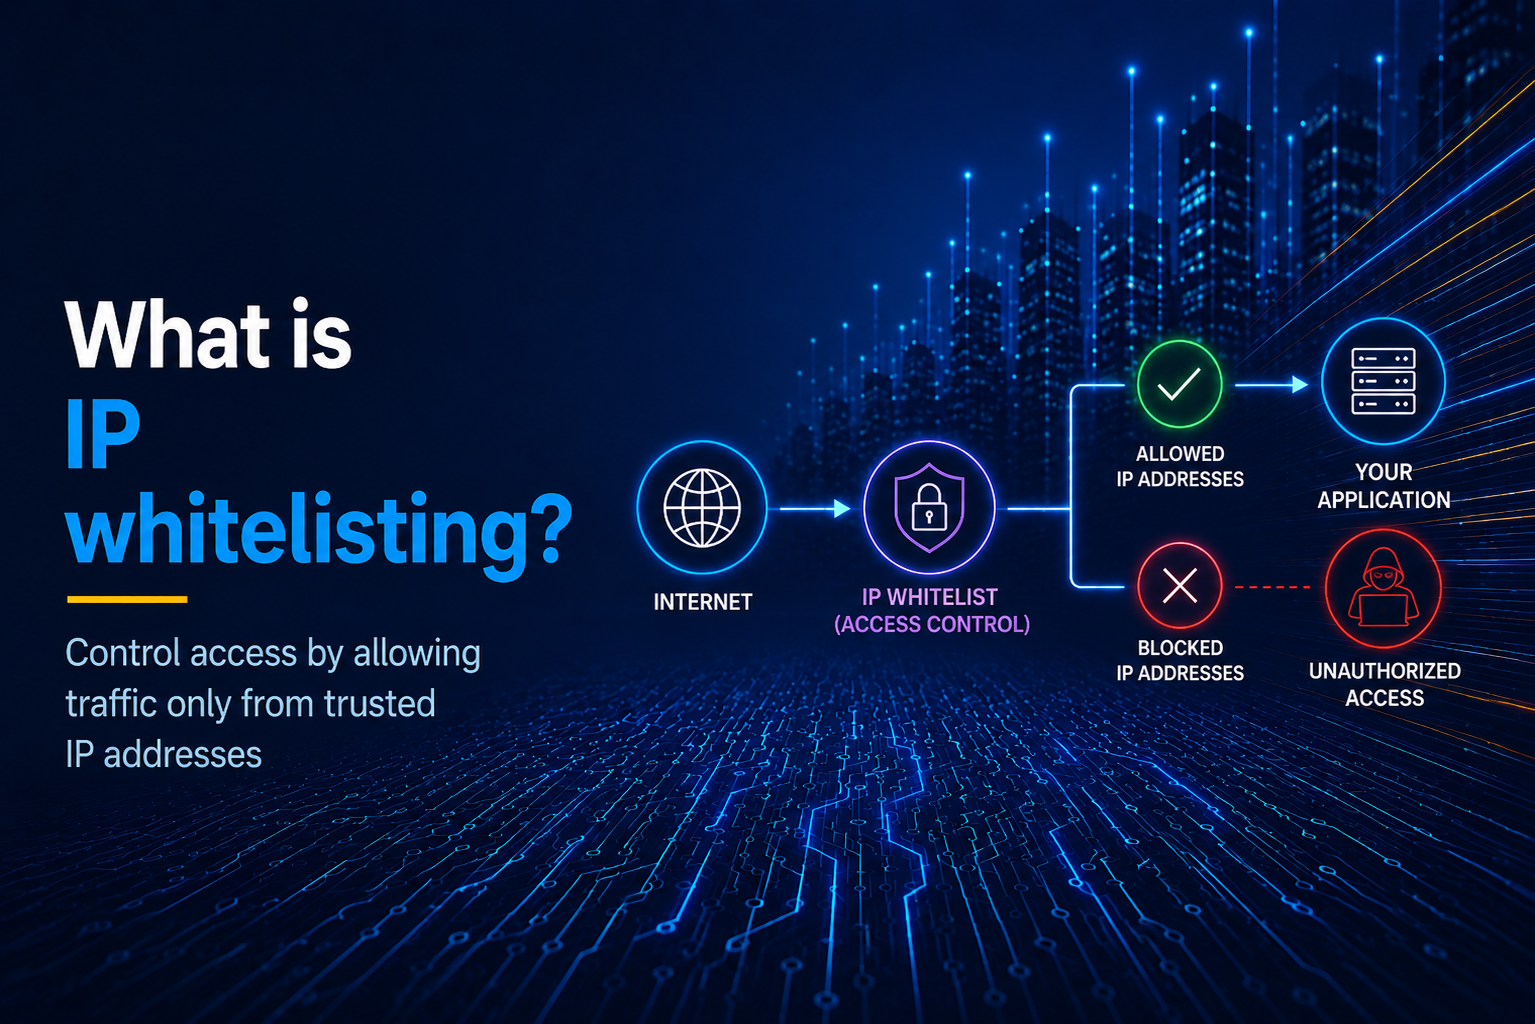
IP Whitelisting is an access control policy that lets only a set of allowed IP addresses access a system, network, or application, while blocking connections from all other IPs. A client will be blocked even if it has the right credentials when its IP is not on the allowlist. This adds another layer of security over credential-based security such as passwords and API keys. While credentials may be illegally acquired and readily used, IP addresses cannot be used by malicious actors as easily. The term whitelisting is also synonymous with allowlisting, the latter being the preferred and modern term in the industry because it is more inclusive.
IP whitelisting is the opposite of IP blacklisting, where all IPs are allowed by default unless specific IPs are chosen to be blocked. That is more of a reactive security measure where you block an IP only if it is suspicious for some reason. With IP whitelisting, by contrast, you block everything to start with and allow only a small set of trusted IP addresses to connect.
Table of Contents
- How IP Whitelisting Works
- How To Whitelist An IP
- Common Use Cases For IP Whitelisting
- Why You Need A Static IP For IP Whitelisting
- Getting A Static IP For Whitelisting Using OutboundGateway
- IP Whitelisting Limitations And Pitfalls
- IP Whitelisting vs. Blacklisting/Blocklisting
- Implement IP Whitelisting Without Changing Your Cloud Architecture
- Frequently Asked Questions
How IP Whitelisting Works
IP whitelisting works by defining allowlists of IP addresses at any of the backend layers that client requests would go through. This could be an operating system-wide firewall such as ufw, or configured in database servers such as PostgreSQL or MySQL. Reverse proxies and servers such as NGINX, Apache, or Caddy can also filter IPs by whitelisting. Allowlists can also be defined on applications and APIs, with even per-user-level custom allowlists. Finally, they can also be configured on cloud provider infrastructure such as AWS, Google Cloud, Azure, payment gateway services, email APIs, and platforms such as Salesforce.
Fundamentally, IP whitelisting works as follows. When the client sends a network connection request, the firewall/application/server can see the IP address of the client. It then checks if this incoming IP is defined in the configured allowlist. If yes, the connection proceeds; otherwise, the connection is interrupted/closed, or a 403 response is sent (for HTTP/HTTPS).
Range Based IP Whitelisting Using CIDR Notation
Using the CIDR (Classless Inter-Domain Routing) notation, one can succinctly define a whole range of IP addresses to be allowlisted in all applications and services that support this notation. Essentially, the notation consists of a regular IP address, followed by a slash character (/) and a positive integer. The integer represents the number of bits in any IP address that must be identical to those of the specified IP to fall in this range. Let's see how this works out for defining ranges of IPv4 and IPv6 addresses.
For IPv4 addresses, there are 32 bits in total, typically represented as 4 discrete 8-bit integers (0-255) separated by dots. So appending /24 means the last 8 bits (the whole integer) can change. Let's see some examples:
223.186.96.171/31 : 223.186.96.170 - 223.186.96.171 (2 IPs)
223.186.96.171/30 : 223.186.96.168 - 223.186.96.171 (4 IPs)
223.186.96.171/24 : 223.186.96.0 - 223.186.96.255 (256 IPs)
223.186.96.171/16 : 223.186.0.0 - 223.186.255.255 (65,536 IPs)
An IPv6 address is 128 bits long, consisting of 8 units of 16-bit hexadecimal integers (0-ffff) separated by colons. The CIDR notation works similarly here, except you still specify the number of bits that remain identical after the slash as a regular integer, not hexadecimal. Examples below:
2401:4900:3305:b282:65d6:0ca7:e38a:0000/112 ->
  start: 2401:4900:3305:b282:65d6:0ca7:e38a:0000
  end:   2401:4900:3305:b282:65d6:0ca7:e38a:ffff
  ips:   65536

2401:4900:3305:b282:0000:0000:0000:0000/64 ->
  start: 2401:4900:3305:b282:0000:0000:0000:0000
  end:   2401:4900:3305:b282:ffff:ffff:ffff:ffff
  ips:   2^64 (~ 18 quintillion)
How To Whitelist An IP
IP whitelisting can be configured at various levels of the architecture, such as cloud provider, OS-level firewall, reverse proxy, database, or the application level. Let's look at how to do this for some common applications. For the applications not listed here, you can always consult their official documentation.
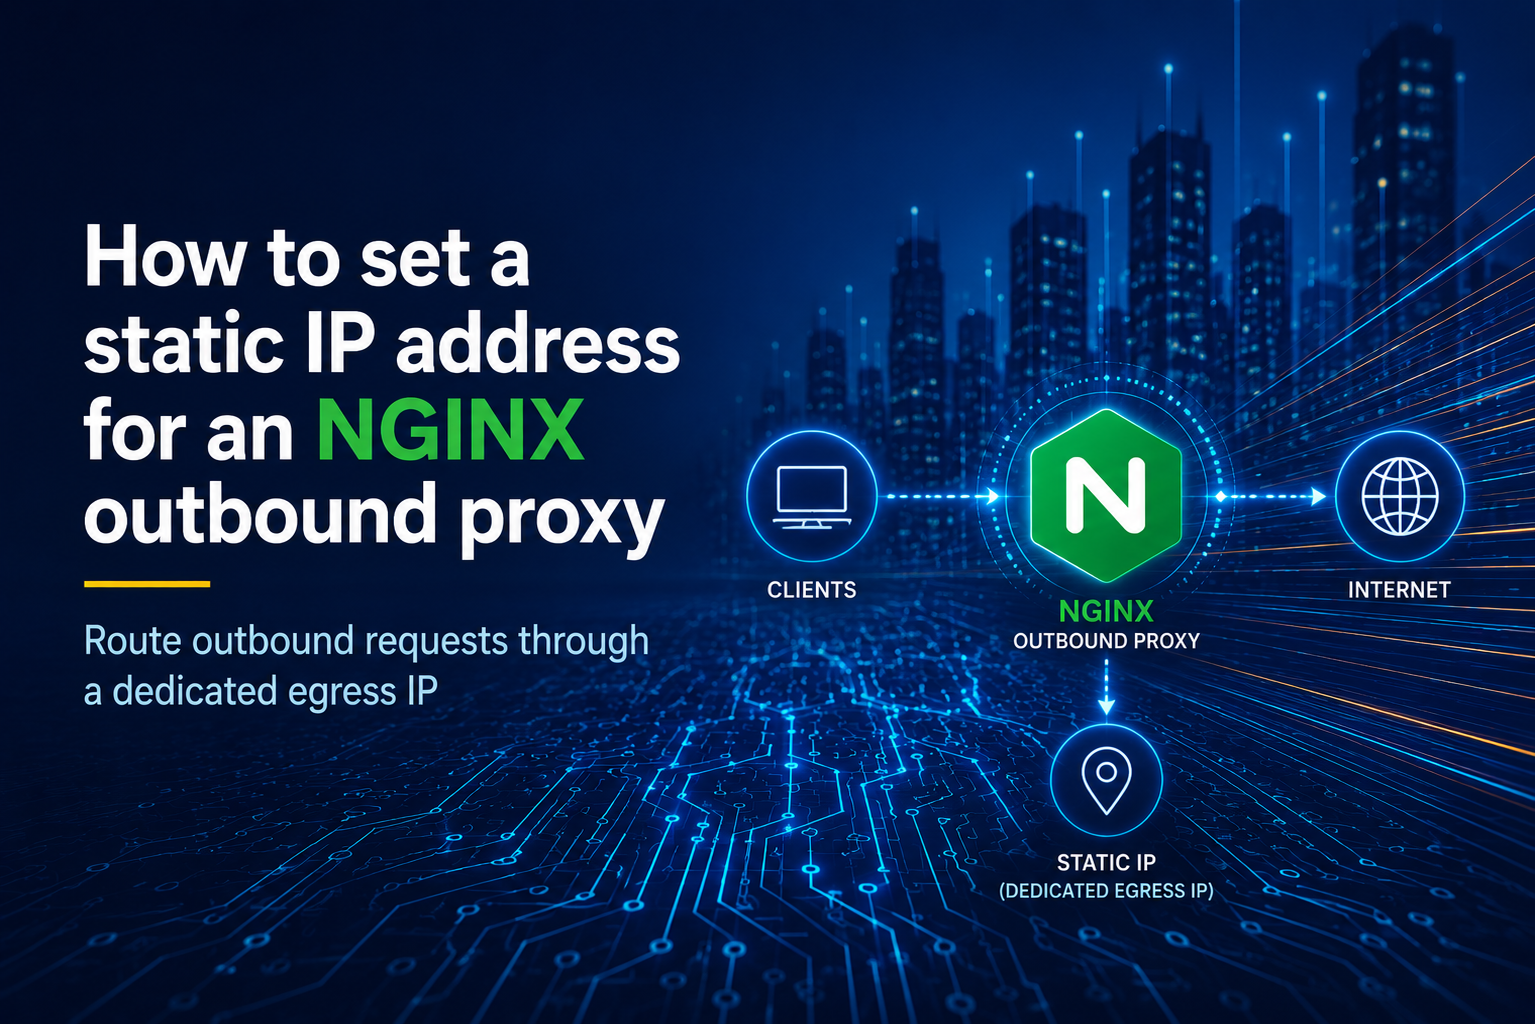
NGINX:
Use one or more allow directives inside the location block to specify IP addresses or ranges, and follow with a deny all to block all other IPs:
server {
    listen 80;
    server_name example.com;

    location / {
        allow 192.168.1.100;  # Allow specific IP
        allow 192.168.1.0/24; # Allow a CIDR Range
        deny all;             # Block all other IPs

        # Your other directives
    }
}
AWS Lambda Inbound Requests:
There are several ways to restrict inbound requests from accessing an AWS Lambda function by IP whitelisting. The explicitly recommended way is to set up an AWS WAF (Web Application Firewall) for the API gateway of the Lambda function. However, this has additional costs and cumbersome setup steps. Another way is to check the incoming IP in your Lambda function code itself and return a 403 if it's not in your allowlist. Add the following to the start of your Lambda function code (for Node.js):
export const handler = async (event) => {
    // add the below lines right at the start
  const allowedIps = ['allowed-ip-1', 'allowed-ip-2'];
  const sourceIp = event.requestContext?.http?.sourceIp;
  if(!allowedIps.includes(sourceIp)) {
    return {
      statusCode: 403,
      body: "IP Not Allowed"
    }
  }

  // continue the rest of your Lambda function logic below
  // ...
}
AWS EC2 Inbound Traffic
For an AWS EC2 instance, you can set up IP whitelisting quite easily via the console. Open your EC2's page on the console, click on the "Security" tab and open "Security Groups". Here you can configure IP whitelisting by adding inbound rules. For each rule, you select the port or protocol (SSH, HTTP, HTTPS, etc.) and enter an IP or a CIDR range as the source.
SSH:
Add an AllowUsers directive containing allowed username-IP pairs to the bottom of sshd_config, typically located at /etc/ssh/sshd_config on Linux servers:
AllowUsers alice@192.168.1.100 bob@192.168.1.0/24
This directive will automatically block all other username-IP pairs from being able to access the service except for the ones specified here.
PostgreSQL Server:
Add a line to pg_hba.conf, usually located at /etc/postgresql/<version>/main/pg_hba.conf on Linux servers:
# host  DATABASE  USER   ADDRESS         METHOD  [OPTIONS]
host    all       alice  192.168.1.0/24  scram-sha-256
Common Use Cases For IP Whitelisting
IP whitelisting can provide additional security to several components of an IT architecture and processes, including the following:
- API Access Control: Sensitive partner APIs like payment processors, email senders, and core enterprise APIs that are typically accessed only via your application backend. They can be restricted to respond to inbound requests from your application backend IP only.
- Database Access: Only your application backend needs to connect to your database, so only that IP can be allowed instead of the whole internet. Highly recommended for PostgreSQL, MySQL, MS SQL Server, MongoDB, etc.
- Admin Panel: Your application's admin panel can be restricted to only the organization head's IP address or only the IPs allocated to the office premises.
- Version Control & CI/CD: Platforms such as GitHub and GitLab can restrict some or all features available to the users based on the IP address they are accessing the platform from.
Why You Need A Static IP For IP Whitelisting
The biggest hurdle encountered while implementing IP whitelisting in practice is that the clients don't have a fixed static IP address to be added to the allowlist. Cloud runtimes and serverless platforms such as Heroku, AWS Lambda, Netlify, Vercel, etc. don't provide static IPs out of the box. Platforms or no-code tools like Lovable, Zapier, and Airtable have their own sets of outbound IP addresses which may change without notice. Docker containers and Kubernetes clusters may run with different IPs each time.
Further, on the engineer's local machine, the IP address may change if the engineer works from home, or if the office connection is reset. This also affects the AI coding agents they run on their machines, which make outbound requests to services with changing IPs.
In cases like these, you might need a dedicated service that provides a static IP address to be added to the allowlist and route your client through this service.
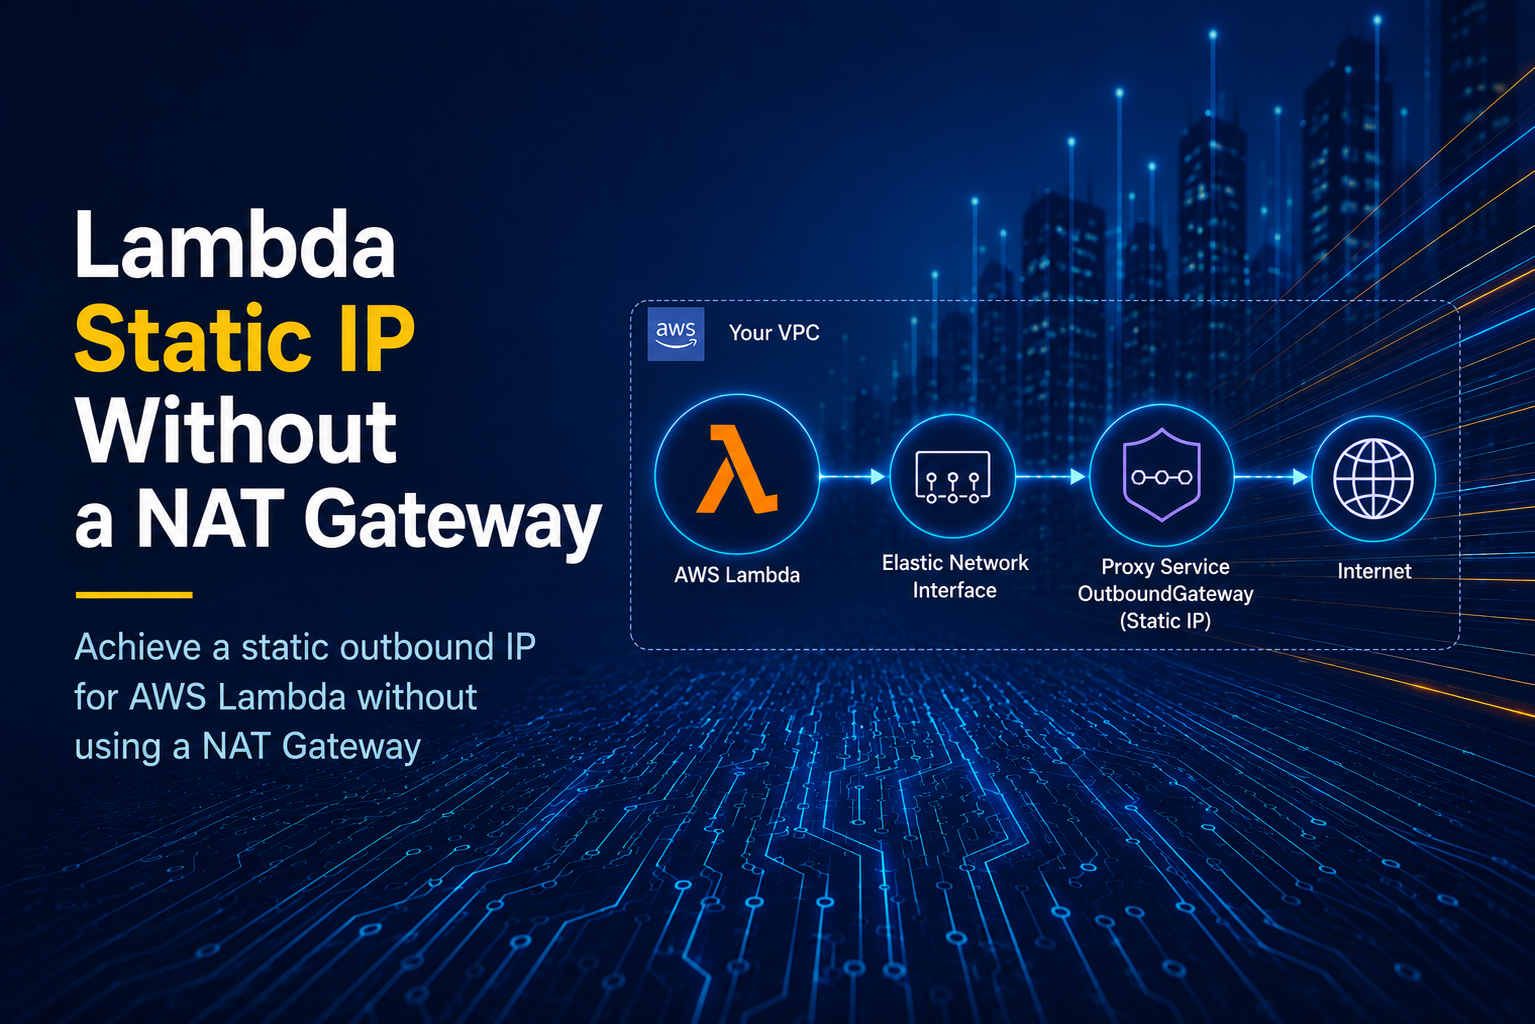
Getting A Static IP For Whitelisting Using OutboundGateway
You can use a service like OutboundGateway to access APIs using a static IP that you can allowlist on the other end. This service acts as a proxy layer between your client and the API. Your client uses the proxy to send the request. The API sees the IP of the proxy in the incoming request and responds back to the proxy. The proxy sends the response back to your client. Since the proxy always uses one of two fixed IP addresses, you can just add these two IPs to the allowlist wherever necessary.
To get started, you can sign up for OutboundGateway and use your credentials to make an HTTP request through the proxy. An example with curl:
curl \
  -x https://eu-01.outboundgateway.com:8443 \
  -U your_username:your_password \
  https://outboundgateway.com/ip/
{"ip": "(Always one of the two fixed IPs shown on your dashboard)"}
You can also use this proxy in any supported programming language of your choice, such as Python:
import requests

PROXY_URL = 'https://username:password@eu-01.outboundgateway.com:8443'
proxies = {"https": PROXY_URL}

response = requests.get(
        "https://outboundgateway.com/ip/",
        proxies = proxies,
)

print(response.json()['ip'])
# Always prints one of the two fixed IPs shown on your dashboard
For detailed guidance and more examples in Python, Node.js, PHP, Java, Ruby, etc, check the OutboundGateway Docs.
IP Whitelisting Limitations And Pitfalls
Here are some limitations and common pitfalls to watch out for when you're setting up or using a service with IP whitelisting enabled:
- IP Spoofing: IP addresses can be spoofed. Though the service may not respond to the malicious sender in this case, it might still process the request, and that might be damaging enough (like dropping a table in your database).
- Avoid Allowlisting Shared IPs: Allowlisting the whole of your cloud provider (e.g. AWS) region's IP range may be a quick and dirty workaround to not having a static IP, but such IPs are shared and accessible to almost anybody with an AWS account. It's recommended to use a small set of IP addresses that only you have access to.
- IPv4 vs. IPv6: Cover both if you need both.
- Don't Blindly Trust IPs In Headers: While deploying applications behind load balancers such as NGINX, the reverse proxy forwards the HTTP requests from its own IP, while inserting the local IP in a custom
X-Forwarded-Forheader. Now, this could be spoofed by the original sender, so try not to use the header for IP whitelisting. If you have to, configure your load balancer to strip this header from all incoming client requests before inserting the actual IP, so you can actually trust it.
IP Whitelisting vs. Blacklisting/Blocklisting
IP whitelisting/allowlisting is a default-deny approach that differs from IP blacklisting/blocklisting, which is a default-allow approach. With IP whitelisting, all IPs are blocked by default, except the ones specified in an allowlist. This is highly secure as the attack origins are tremendously reduced to a few known points. It is the recommended approach for any service that doesn't need to be publicly available for the whole internet to use directly.
With blocklisting, it is relatively less secure, as all the IPs are allowed by default and only a smaller set of IPs predefined in the blocklist will be blocked. This is recommended for public-facing services to provide hassle-free access to the general users while blocking off known bad actors. Let's look at the differences in the table below:
| Method | IP Whitelisting / Allowlisting | IP Blacklisting / Blocklisting |
|---|---|---|
| Approach | Default-Deny, allow only allowlisted | Default-Allow, block only blocklisted |
| Security | High, very small set of possible attack origins | Medium, only works against known bad actors who could always use a new IP |
| Best For | Internal networks, backend services, critical APIs such as payments | Public-facing websites, APIs, and services |
| Drawbacks | Can be too restrictive and needs workarounds if a static IP can't be provided | Reactive measure, bad IPs can be flagged only after malicious actions are attempted and detected |
Implement IP Whitelisting Without Changing Your Cloud Architecture
IP whitelisting is an effective access control mechanism typically used for backend services communicating with each other. But these services need to have stable IPs so they can be allowlisted effectively. In a modern cloud environment, getting a static IP can become challenging as the service provider typically allots a pool of shared IPs to your service at their convenience.
A dedicated static IP proxy such as OutboundGateway is the simplest way to resolve this challenge and provide your service a pair of fixed static outbound IP addresses that can be allowlisted on any partner service. All requests from your service will go through these IP addresses only. OutboundGateway is the only EU-owned static outbound IP proxy service providing EU-based static egress IPs. That means it is truly sovereign and not controlled by any foreign country like the US or China.
Built with ❤️ for EU businesses who care about privacy and sovereignty.
Frequently Asked Questions
What is the difference between IP whitelisting and IP blacklisting?
IP whitelisting (allowlisting) is a default-deny approach where every IP is blocked by default and only a small, trusted set of IPs is permitted to connect. IP blacklisting (blocklisting) is the opposite default-allow approach, where all IPs are permitted unless they appear on a blocklist. Whitelisting is more secure and is best suited for internal services, databases, and critical APIs, while blacklisting is better for public-facing services that must remain broadly accessible.
How do I whitelist an IP address in NGINX?
To whitelist an IP in NGINX, add allow directives for each trusted IP or CIDR range inside your location block, then add deny all to block every other source. Reload NGINX with sudo systemctl reload nginx to apply the change. Keep in mind that NGINX will see its own IP for traffic passing through an upstream load balancer, so configure your X-Forwarded-For header handling carefully if applicable.
Why do I need a static IP for IP whitelisting?
IP whitelisting requires the client's IP to be added to the allowlist, so that IP must remain stable over time. Modern cloud runtimes, serverless platforms (such as AWS Lambda, Vercel, and Netlify), and no-code tools rotate their outbound IPs without notice, which breaks allowlist entries. Using a dedicated static IP proxy like OutboundGateway gives your service two fixed outbound IPs that can be reliably allowlisted on any partner service.