Table of Contents
- Why Kubernetes Outbound IPs Change
- Finding your Current Outbound IP
- Option 1: Use Cloud NAT for Static Egress
- Option 2: Use an Egress Gateway
- Option 3: Use an Outbound Proxy
- Verifying whether the Static Outbound is working
- Common Mistakes
- Choose the Smallest Egress Pattern That Works
Kubernetes is built to be resilient and scalable, meaning workloads can be moved from one node to another by the scheduler. If you've ever run or maintained a cluster, you've probably seen this happen: pods are rescheduled, nodes are replaced, and the autoscaler adds or removes pods to cope with the load. But this creates a problem with outbound traffic. If you have a service such as a database or firewall that relies on a whitelisted or stable IP address, then those services will possibly reject your traffic as it can come from any number of nodes in the cluster.
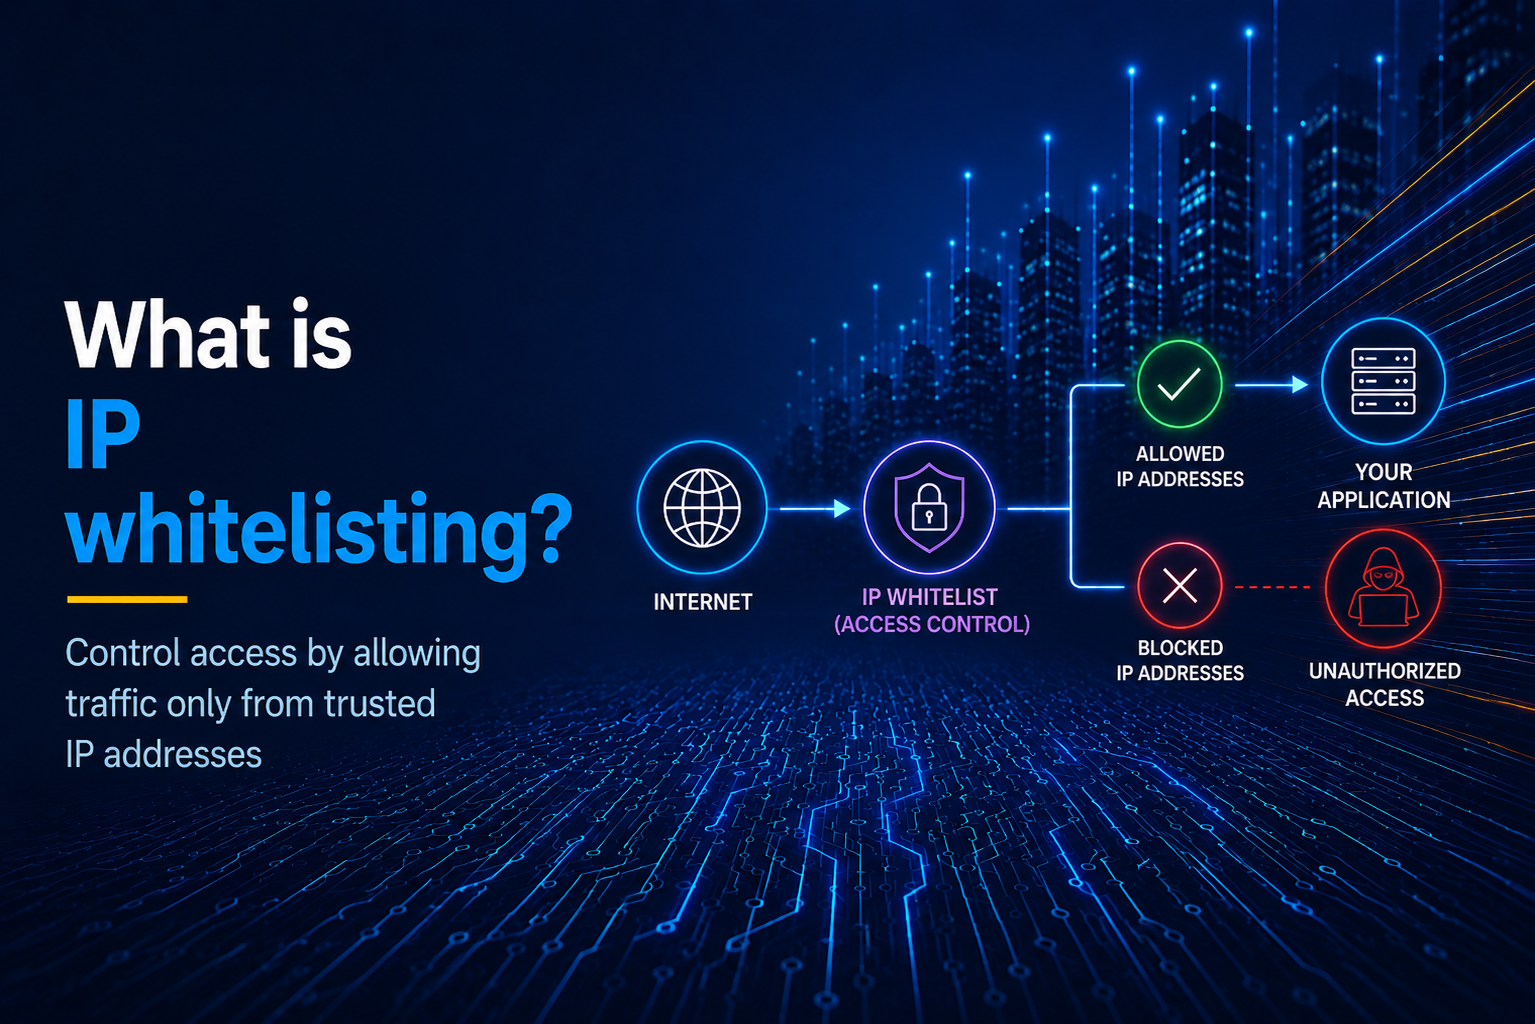
It's not uncommon for third-party services to require an allowlist of IP addresses that are allowed to access their service. This is usually done to prevent abuse or to ensure that only trusted traffic is accessing the service. Typically, this shows up in production, and if your service is not built to handle this, then it could lead to downtime or other issues.
This guide dives into a number of options for giving Kubernetes workloads a static outbound IP such as Cloud NAT, Egress Gateways, and proxy-based routing.
Why Kubernetes Outbound IPs Change
Kubernetes has a well-defined model for inbound traffic. You expose a Service, attach an Ingress or the modern Gateway API, or a load balancer, and route requests into the cluster. There are multiple providers for each of these options such as NGINX Ingress Controller, Traefik, or Cilium. However, outbound traffic is less well defined. A pod opens a connection to the internet outside the cluster, and the final source IP is decided by the network path outside the pod.
That path depends on where your cluster runs:
- On a managed cloud cluster such as AWS EKS, outbound traffic often leaves through a node public IP or a NAT gateway.
- On a private cluster, nodes usually have no public IP. Traffic leaves through a NAT gateway sitting in a public subnet.
- On a bare-metal cluster such as a cluster running on Hetzner servers, egress may go through your router, firewall, or CNI-specific egress.
- In service mesh setups, traffic may leave through a mesh egress gateway instead of directly from the workload pod.
This means a Kubernetes Service of type LoadBalancer does not solve outbound IP stability. It is concerned with providing a stable inbound address, but it does not control the source IP used when a pod calls an external API.
If a third-party system uses IP allowlisting, you need to control egress. Common examples include payment processors such as Stripe, CRMs such as Salesforce, private package registries, hosted databases without a public interface, and internal APIs which are only accessible behind a firewall.
Finding your Current Outbound IP
We're working on the assumption that you already have a cluster set up with workloads running in that cluster. Before changing anything, we need to understand what is happening now. To do this, we can run a short-lived pod and call an IP-check endpoint:
kubectl run egress-check \
  --rm -it \
  --restart=Never \
  --image=curlimages/curl:8.10.1 \
  -- <https://ifconfig.me>
On Linux, macOS, and Windows terminals, this kubectl command behaves the same as long as your kubeconfig points at the cluster. After running it a few times, you may see one IP or several. Both results tell you whether you need a cluster-wide egress fix or a workload-specific one. If your cluster autoscaler is active, also test after scaling a node pool.
You can also deploy a repeatable test pod which will allow you to see the outbound IP in a more reliable way:
apiVersion: v1
kind: Pod
metadata:
  name: egress-check
  labels:
    app: egress-check
spec:
  restartPolicy: Never
  containers:
    - name: curl
      image: curlimages/curl:8.10.1
      command: ["sh", "-c"]
      args:
        - |
          echo "Outbound IP:"
          curl -s https://ifconfig.me
          echo
Apply the Pod with:
kubectl apply -f egress-check.yaml
Then check the logs:
kubectl logs pod/egress-check
You should see the outbound IP of the pod in the logs.
Outbound IP:
123.45.67.89
You can then delete the pod with:
kubectl delete pod egress-check
Option 1: Use Cloud NAT for Static Egress
A popular solution is to run worker nodes in private subnets and route outbound public traffic through a NAT gateway provided by a cloud provider with one or more reserved public IP addresses, which will then be used as the outbound IP for the cluster.
This can be a good approach when all or most workloads in a cluster can share the same outbound IP. The vendor allowlist gets one static address. Your pods keep using normal HTTP clients, database drivers, and SDKs.
No application code changes are needed.
The tradeoff is scope and pricing. A NAT gateway applies at the subnet or route-table level. If several teams share a cluster, they may all inherit the same egress IP unless you split node pools, subnets, or routing rules. And of course, a NAT gateway costs money, so it's another cost to consider.
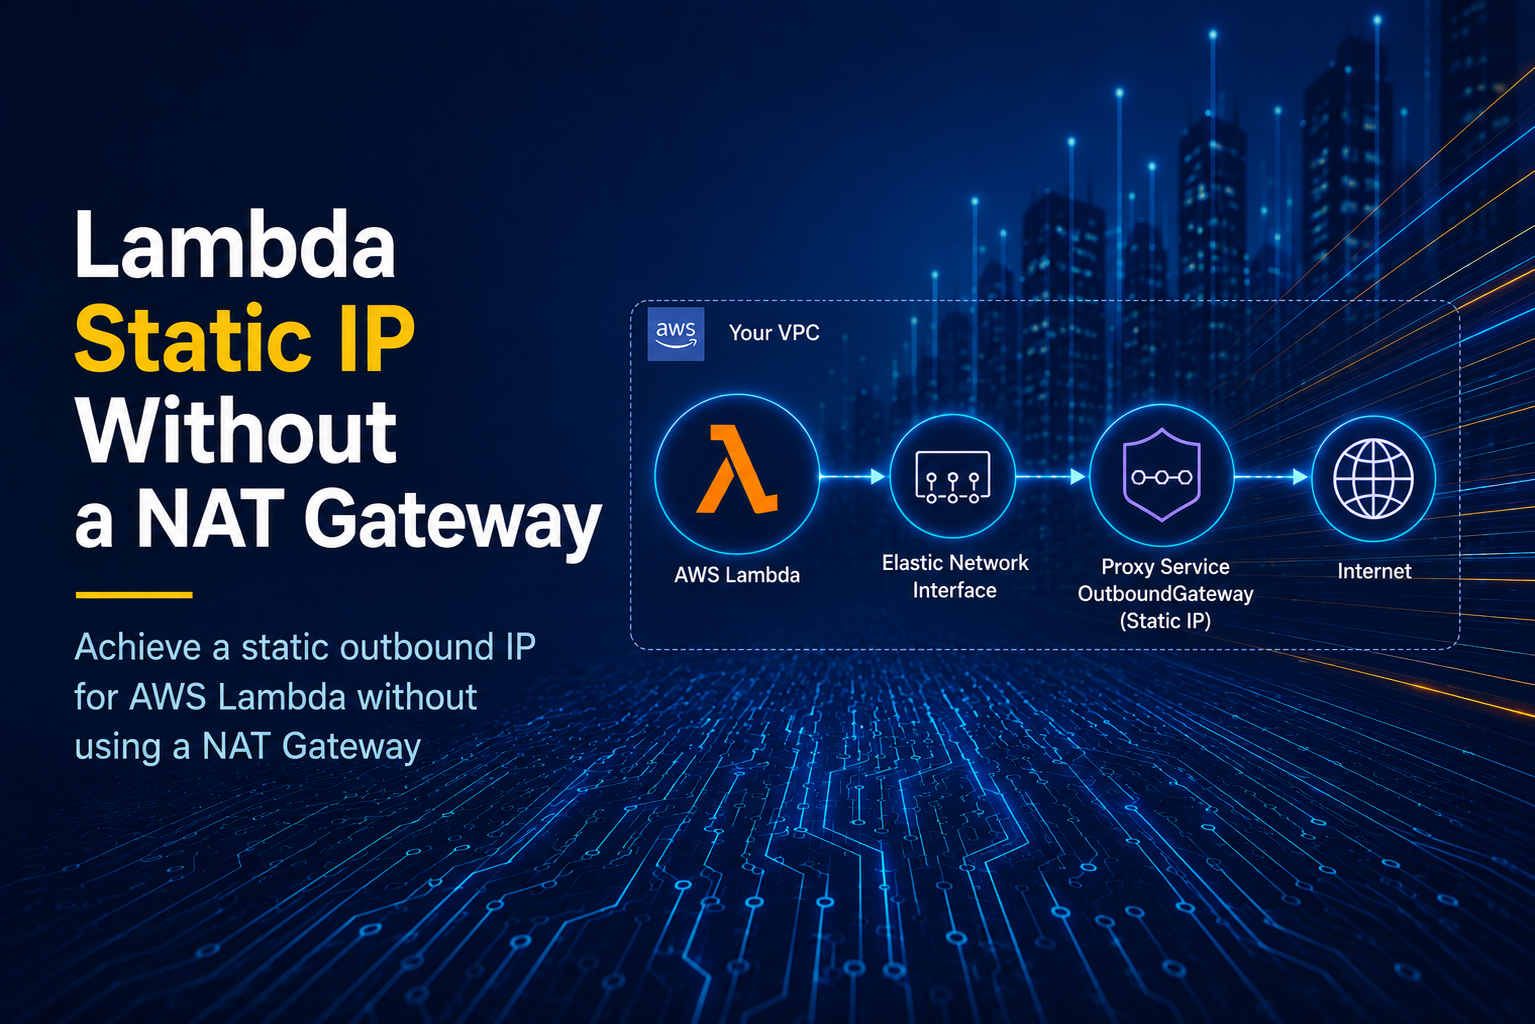
AWS Elastic Kubernetes Service (EKS)
On AWS EKS, the common pattern is:
- Put EKS worker nodes in private subnets.
- Create a NAT Gateway in a public subnet.
- Attach an Elastic IP to that NAT Gateway.
- Route
0.0.0.0/0from private subnet route tables to the NAT Gateway.
Once those steps are completed, pods running on nodes in those private subnets use the Elastic IP assigned to the NAT gateway as their public outbound IP.
The route table is the part people forget. Creating the NAT Gateway is not enough. The private subnet must route internet-bound traffic through it.
Google Kubernetes Engine (GKE)
On GKE, a common pattern is to use Cloud NAT with a reserved static external IP which will then be used as the outbound IP for the cluster:
- Reserve a regional external IP address.
- Create or update a Cloud Router which will be used to route traffic to the NAT gateway.
- Configure Cloud NAT for the subnet ranges used by your GKE nodes.
- Assign the reserved IP to the NAT configuration.
GKE clusters with private nodes commonly use this pattern. Once configured, pods egress through the Cloud NAT IP instead of random node addresses.
Cloud NAT summary
A cloud provider's NAT gateway is the simplest option when you want a static IP for your whole cluster. It's cloud-native and easy for your engineering team to understand and maintain.
However, it may not be the best solution when you need per-namespace or per-application static egress. For example, your billing service may need access to a payment API which requires a static IP, while your crawler service should not share the same whitelisted IP. In that case, workload-level routing is usually the more preferred option.
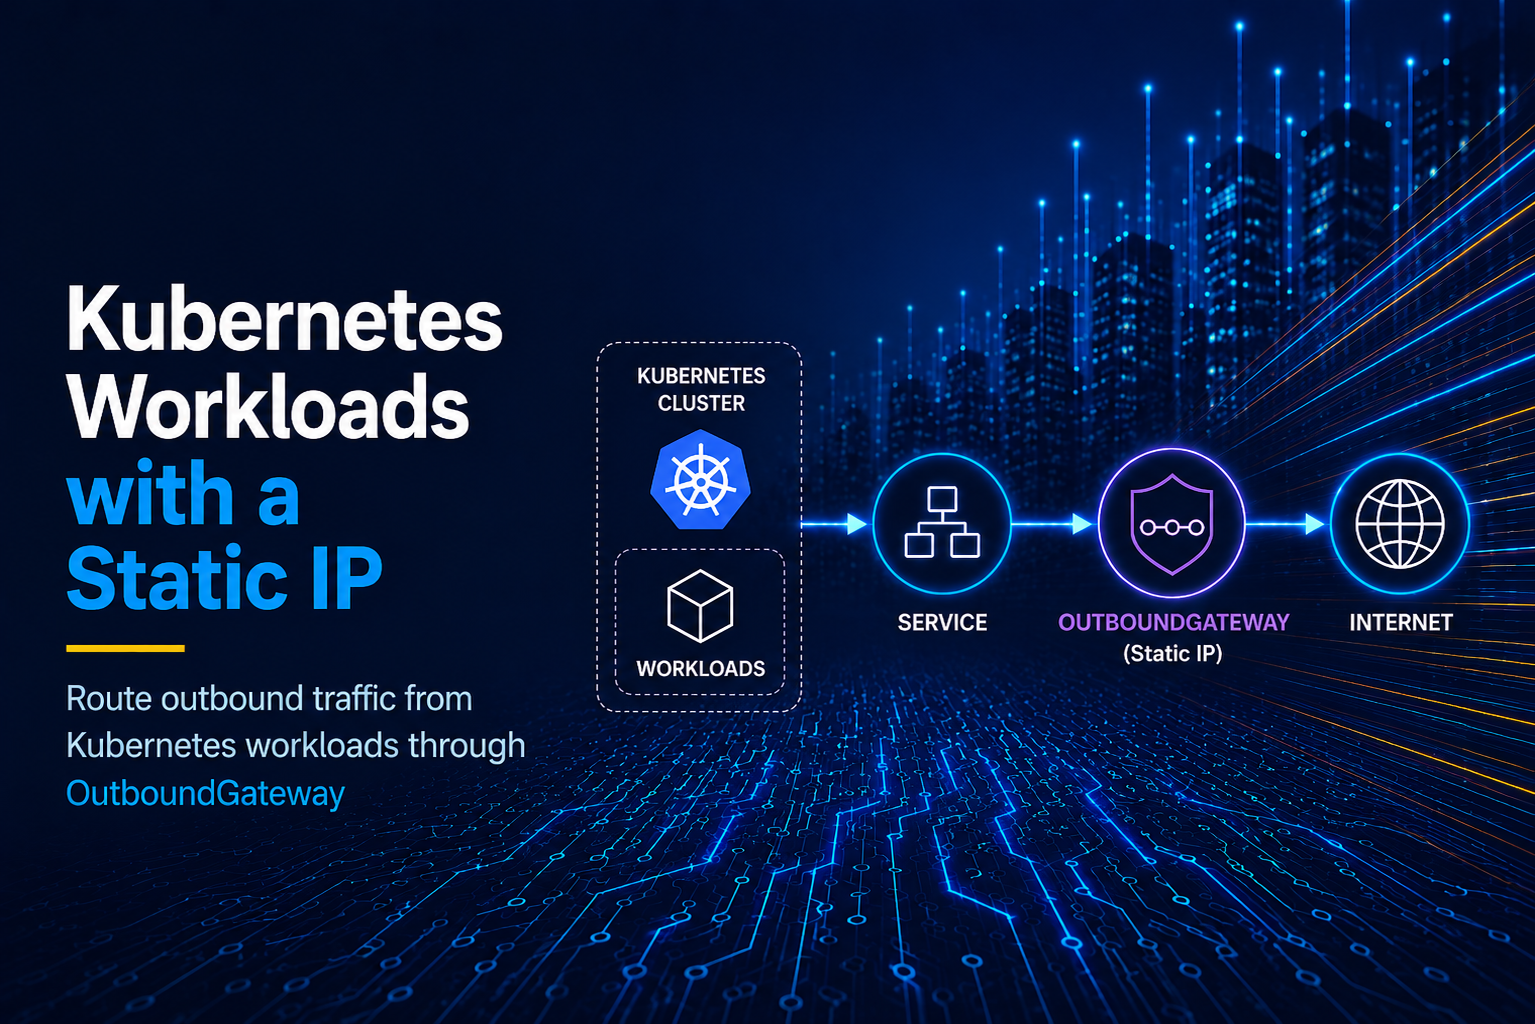
Option 2: Use an Egress Gateway
An egress gateway is a way to provide a dedicated exit point from the cluster. Workloads that need a static outbound IP route traffic through the gateway. Other workloads continue using the default path. Two popular providers are Istio and Cilium, both of which offer Egress Gateways. It gives platform teams a stronger separation boundary than cluster-wide NAT. You can summarise it in plain English as, "only pods with this label may use this egress path," then attach monitoring and policy at the gateway. However, it is more for a platform or cloud team to maintain and monitor.
Here is a simplified shape:
workload pod -> egress gateway pod -> NAT/static public IP -> external API
The structure of your implementation will depend on your stack and the tools you use inside your cluster. Istio and Cilium both provide the functionality for egress gateways. However, some teams build their own solutions with a proxy deployment, node affinity, and cloud NAT on a dedicated node pool.
A Minimal Namespace Selection Pattern
Even if your final gateway uses a service mesh or CNI, start by deciding which workloads can use static egress. Labels are one way to do it by defining custom labels in the metadata.
apiVersion: v1
kind: Namespace
metadata:
  name: payments
  labels:
    egress.outbound/static-ip: "true"
Then label the workloads that need the route:
apiVersion: apps/v1
kind: Deployment
metadata:
  name: payout-worker
  namespace: payments
spec:
  replicas: 2
  selector:
    matchLabels:
      app: payout-worker
  template:
    metadata:
      labels:
        app: payout-worker
        egress.outbound/static-ip: "true"
    spec:
      containers:
        - name: worker
          image: curlimages/curl:8.10.1
          command: ["sh", "-c"]
          args: ["sleep 3600"]
          env:
            - name: API_BASE_URL
              value: "<https://api.billing.com>"
That label is not what routes the traffic, but it provides a way for your Egress Gateway definitions to detect which workloads should be routed through it and which shouldn't.
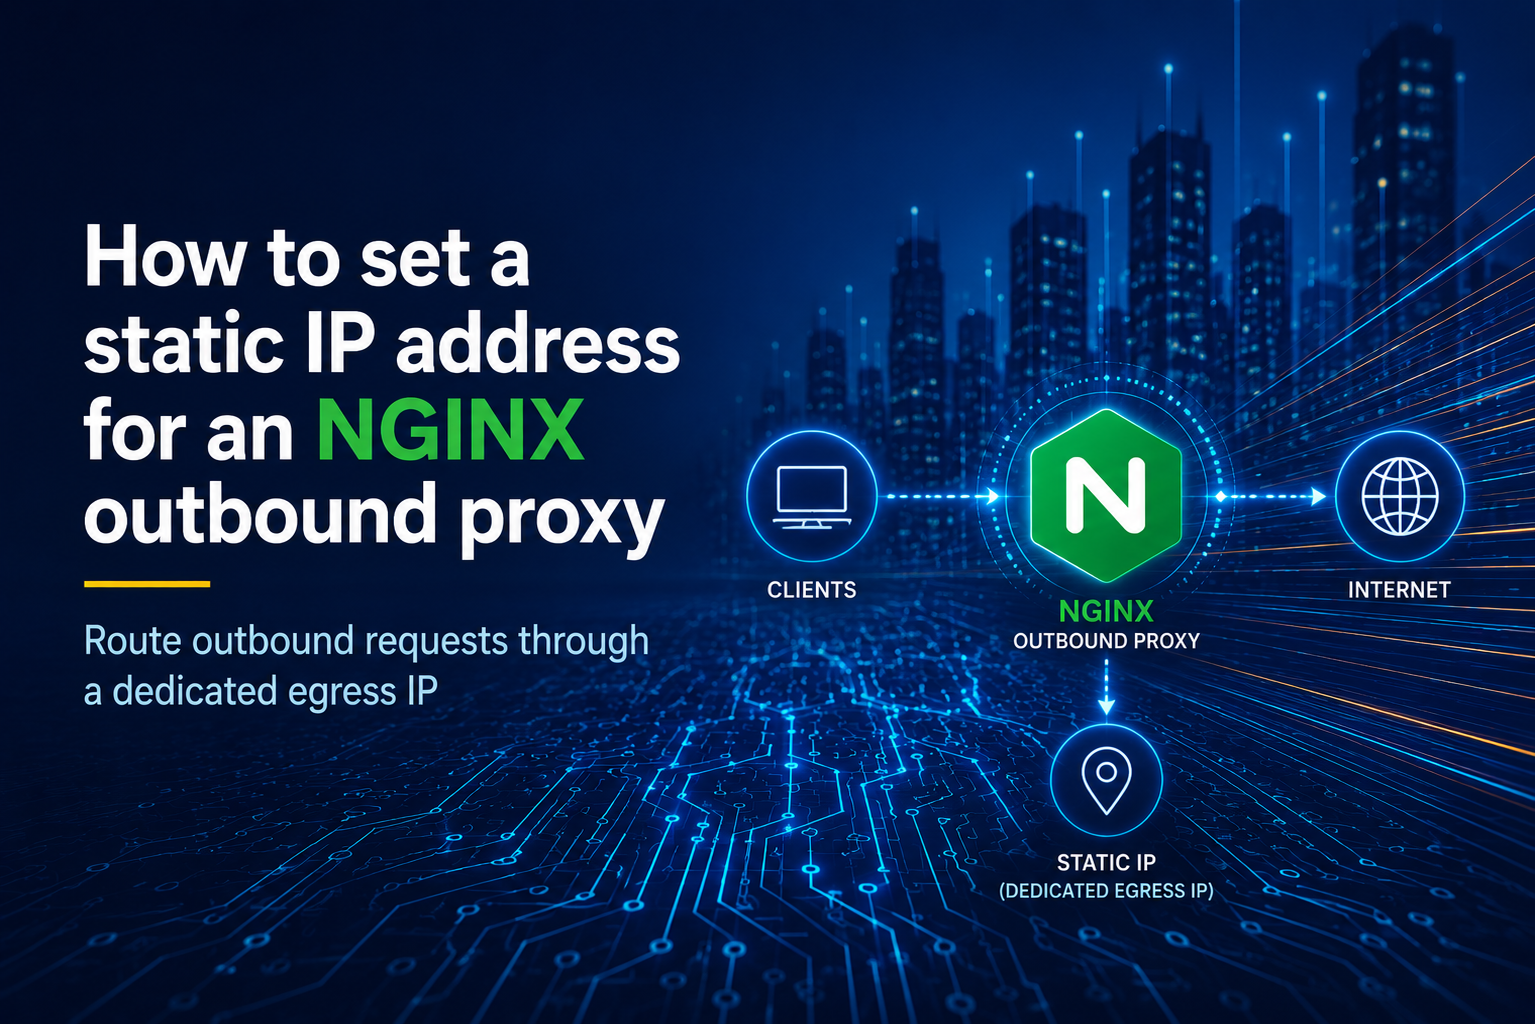
Option 3: Use an Outbound Proxy
Some APIs only need HTTPS access. In that case, an outbound proxy is a practical solution that solves all the issues seen above. It requires application-level configuration instead of cluster-wide or workload-specific configuration. Essentially, how it works is: your application sends outbound requests to a proxy, and the proxy provides a static IP.
This works well for build jobs, AI agents, scraping jobs, and really any backend task that calls an external API.
Most popular HTTP clients respect HTTPS_PROXY and NO_PROXY. You can inject those variables into a Deployment.
For HTTPS_PROXY, you should always make sure to define them as secrets rather than hardcoded plain-text environment variables, and it is always recommended to use a secrets manager such as External Secrets Manager to pull your secrets from an external service like Infisical:
apiVersion: apps/v1
kind: Deployment
metadata:
  name: pricing-sync
  namespace: integrations
spec:
  replicas: 5
  selector:
    matchLabels:
      app: pricing-sync
  template:
    metadata:
      labels:
        app: pricing-sync
    spec:
      containers:
        - name: sync
          image: coimages/pricing-sync:1.0.0-alpine
          env:
            - name: HTTPS_PROXY
              valueFrom:
                secretKeyRef:
                  name: outbound-proxy
                  key: https_proxy
            - name: NO_PROXY
              value: "kubernetes.default.svc,.svc,.cluster.local,10.0.0.0/8,127.0.0.1,localhost"
The NO_PROXY value is important. Without it, internal Kubernetes calls may be sent to the proxy by accident. That can break service discovery, calls to the Kubernetes API server, or traffic between services.
A popular solution for static outbound IP addresses is OutboundGateway. It provides two static outbound IP addresses for you to use in your Kubernetes workloads, supporting HTTPS with authentication so you don't need to manage your own proxies. You inject your proxy connection strings as secrets and your outbound traffic is automatically routed through it. You can learn more about Kubernetes configuration with OutboundGateway. The two static IP addresses make sure your proxy is highly available.
Getting your OutboundGateway credentials
You can sign up for a free trial for OutboundGateway, and then once you have verified your account, you can see your connection credentials on the /dashboard/proxy-information/ page.
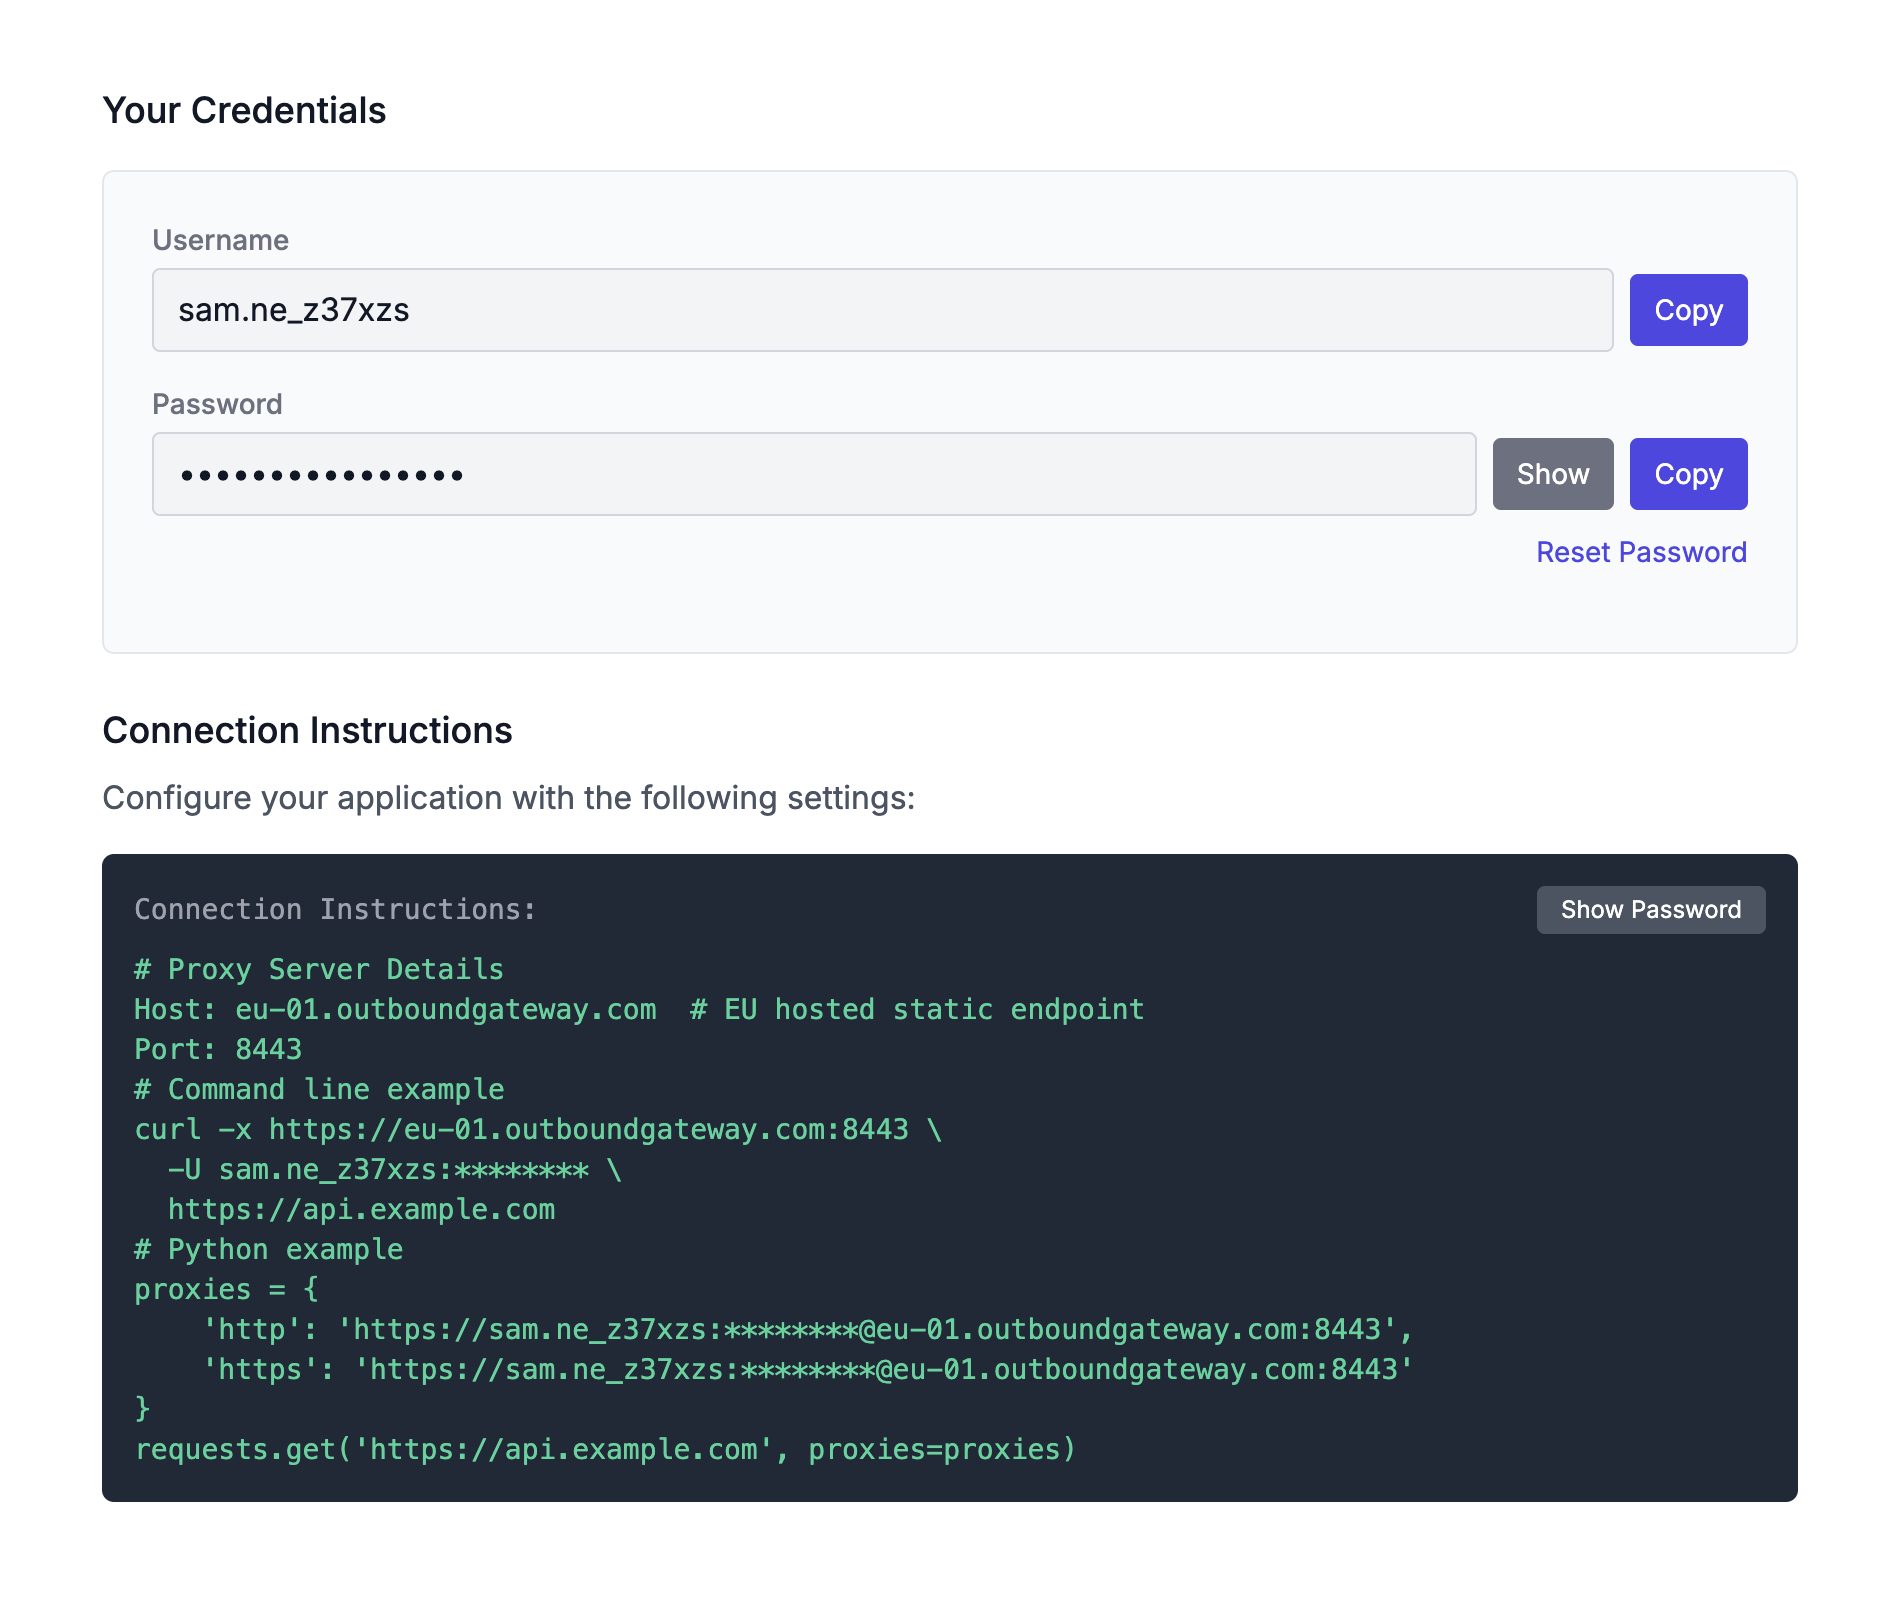
From there, you will want to copy both your username and password which you will need to form the HTTPS connection string. The connection string follows the format of:
https://<username>:<password>@eu-01.outboundgateway.com:8443
These connection strings are what you will want to add as a secret in your cluster. OutboundGateway also provides examples of how to use it in Python, Node.js, and many other languages.
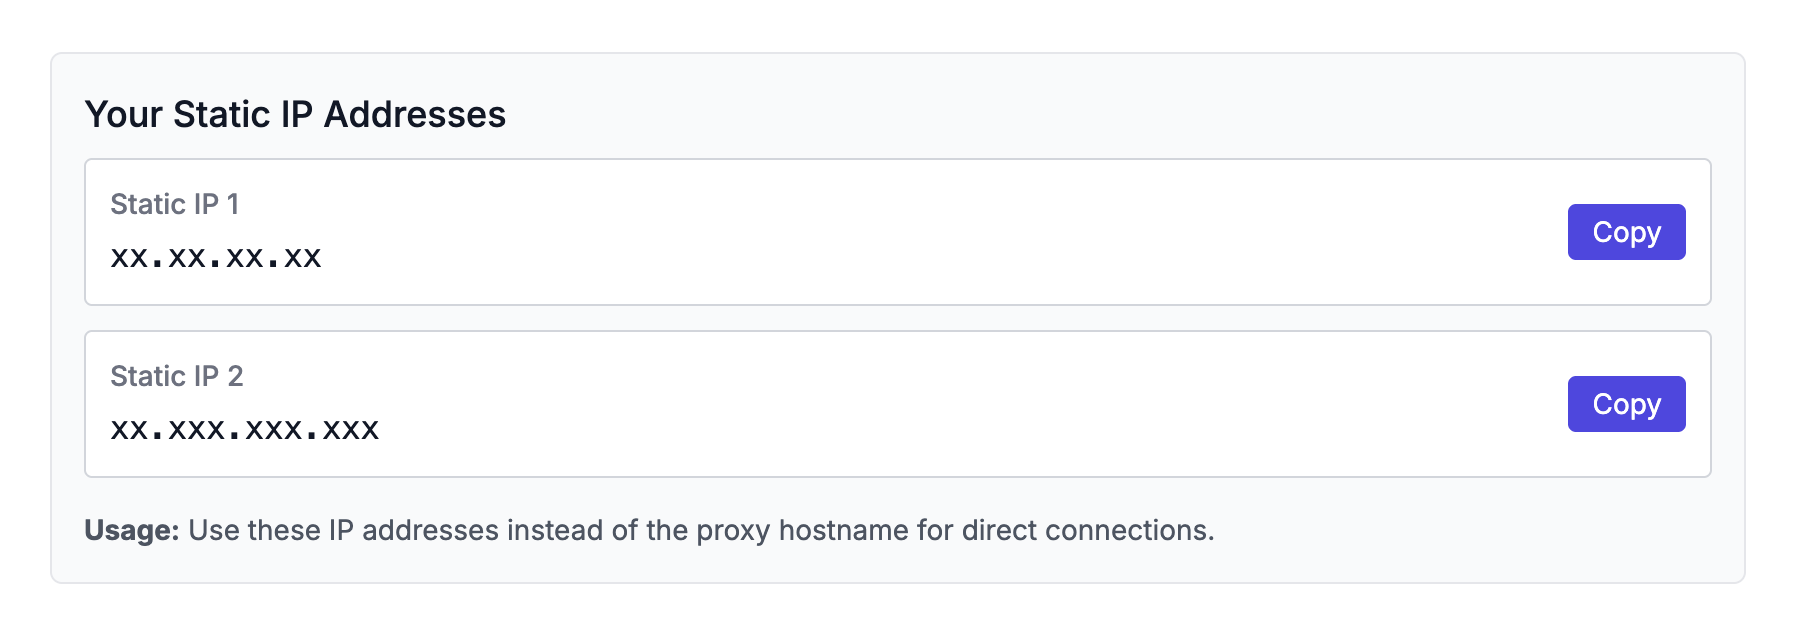
Highly Available
OutboundGateway provides you with a highly available outbound proxy by providing two static IP addresses. This is crucial and highly valuable for critical workloads such as billing services, as if one IP address becomes unavailable, then the other one will provide your workload with a failover to prevent disruption to outbound traffic. You can view your two IP addresses in the OutboundGateway dashboard.
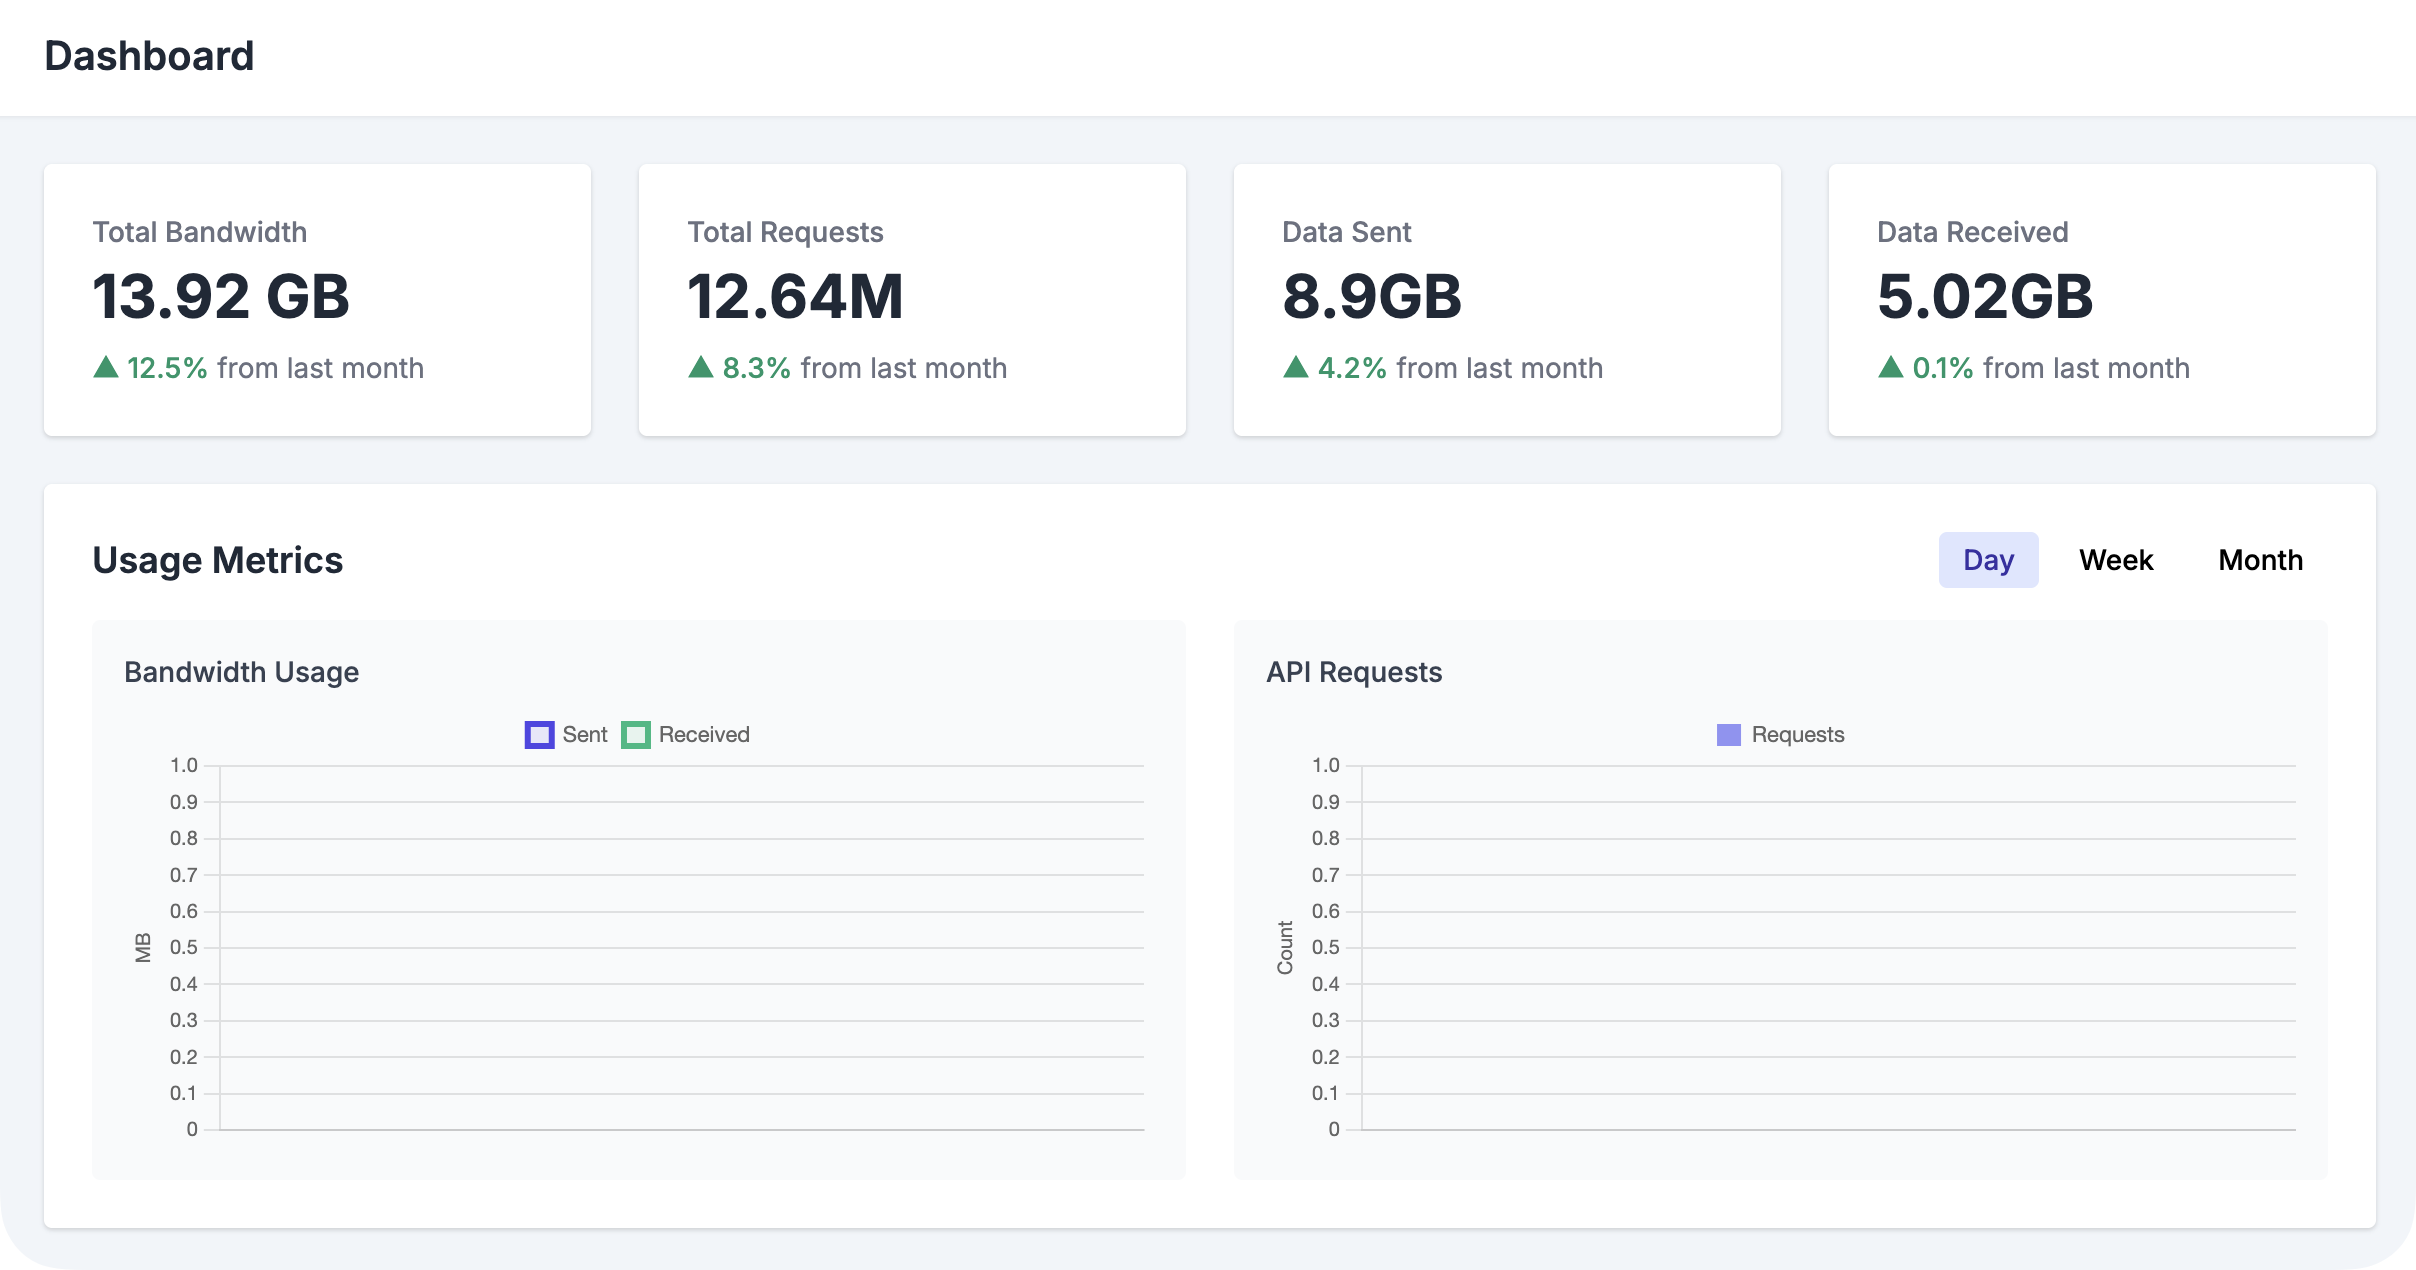
Visualising your outbound traffic
Visualising your outbound traffic is important, and tools like Grafana can help with that, but OutboundGateway also provides insights into:
- Total Bandwidth
- Total Requests
- Data Sent
- Data Received
And allows you to visualize these metrics by Day, Month, and Year.
Verifying whether the Static Outbound is working
After you configure NAT, an egress gateway, or a proxy like OutboundGateway, you will want to verify from inside the same workload path that production traffic will use.
For direct egress, run:
kubectl run egress-check \
  --rm -it \
  --restart=Never \
  --image=curlimages/curl:8.10.1 \
  -- curl -s https://ifconfig.me
For proxy-based egress, test with the same environment variable your application uses:
kubectl run proxy-egress-check \
  --rm -it \
  --restart=Never \
  --image=curlimages/curl:8.10.1 \
  --env="HTTPS_PROXY=https://<username>:<password>@eu-01.outboundgateway.com:8443" \
  -- curl -s https://ifconfig.me
Checking your outbound IP with a service like ifconfig.me is a good first step. It confirms which public IP address your workload is using when it leaves the cluster. However, this does not prove that your third-party integrations are working correctly in production.
You should also test the external service your application actually depends on. For example, if your billing service talks to Stripe, run a test request from the same workload that production uses. This confirms that the request is going through the gateway or proxy, that Stripe can receive it, and that any IP allowlisting or firewall rules are configured correctly.
Common Mistakes
The first mistake is confusing inbound and outbound IPs. A Kubernetes LoadBalancer IP, Ingress IP, or external DNS record are all inbound and do not tell you what source IP your pods use when they make calls outside your cluster.
The second mistake is sharing one allowlisted outbound with too many services. It's harder to audit and harder to get insights from observability. For example, if an external API receives a destructive request from your static IP, you need to know which workload could have sent it.
The third mistake is forgetting private endpoints and internal traffic. If you set HTTPS_PROXY globally and skip NO_PROXY, you may accidentally route internal service calls through an external proxy.
The fourth mistake is not documenting ownership. Someone should own the static IP, the vendor allowlist, and the Kubernetes config.
Choose the Smallest Egress Pattern That Works
If the whole cluster needs one stable outbound IP, use cloud NAT with a reserved address. It is boring in the best way. If only a few workloads need static egress, use an egress gateway or a proxy pattern so you do not grant every pod the same external identity.
If you want a managed path for selected HTTPS workloads, use OutboundGateway and give the vendor the two static IPs that OutboundGateway provides for high availability.
If you'd like a simple solution for providing your Kubernetes workloads with a couple of static outbound IPs, then you can start a 7-day free trial for OutboundGateway.
Frequently Asked Questions (FAQs)
How do I get a static outbound IP for Kubernetes pods?
You have three main options: use a cloud provider's NAT gateway with a reserved public IP (best for the whole cluster), use an egress gateway with a service mesh like Istio or Cilium (best for specific labeled workloads), or use an outbound HTTPS proxy that exposes a fixed IP through the HTTPS_PROXY environment variable (best for application-level control without cluster-wide changes). For HTTPS-based workloads, a managed proxy like OutboundGateway provides two static IPs with high availability and no code changes.
Does a Kubernetes LoadBalancer Service give my pods a stable outbound IP?
No. A Service of type LoadBalancer provides a stable inbound address for traffic entering your cluster, but it does not control the source IP your pods use when they call external APIs. Outbound traffic egresses through the node IP, a NAT gateway, or a CNI-defined path — all of which can change as pods are rescheduled or the cluster scales. To control the outbound IP, you need cloud NAT, an egress gateway, or an outbound proxy.
Why should I set NO_PROXY when using HTTPS_PROXY in Kubernetes?
NO_PROXY tells your HTTP clients which destinations should bypass the proxy and connect directly. Without it, internal Kubernetes traffic — such as calls to the API server (kubernetes.default.svc), service-to-service communication, and cluster-local DNS — may be accidentally routed through your external proxy. This can break service discovery, authentication, and traffic between services. Always include your cluster CIDR, localhost, and .svc/.cluster.local domains in NO_PROXY.